


How to fix this Next.js error: No HTTP methods exported in… Export a named export for each HTTP method instead.
Struggling with the Next.js error "No HTTP methods exported"? In the latest Next.js 14 version, API routes require named exports for each HTTP method instead of default exports with app router and server components. Learn to structure your routes correctly with practical examples and detailed code snippets. Whether you're working with file uploads or other API routes, our step-by-step instructions will help you navigate the changes and avoid common pitfalls. Upgrade your Next.js skills and ensure your applications run smoothly with expert tips and solutions.
If you’re building Next.js applications, chances are: you’re using TypeScript for error handling, and you’re working with API routes in addition to server components. In the new Next.js 14 version (and higher), there has been a push to move away from the /pages router and instead use the /app router in which all components can be server components.
🔊 When you declare API routes, you must write them like this:
Template:
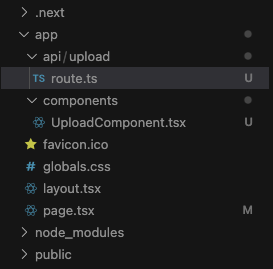
app/api/YOUR-NAME-FOR-THE-ROUTE/route.tsExample for an API route for uploading a file:
app/upload/route.ts
📄 When you declare pages, you must write them like this:
Template:
app/page.tsxorapp/SOMETHING/page.tsxExample for a homepage (url is the domain):
app/page.tsxExample for a page (url is /something):
app/YOUR-NAME-FOR-PAGE-PATH/page.tsx
Here is a visual reference for this:
Once we get the routing down between components, pages, and API routes, one common trap in working with the new app router is how api routes work. This blog discusses some of these problems, specifically when you get an error like this:

❌ The Problem
You might see two different types of errors that look like this:
Error 1:
⨯ Detected default export in 'app/api/…/route.ts'. Export a named export for each HTTP method instead.Error 2:
⨯ No HTTP methods exported in 'app/api/…/route.ts'. Export a named export for each HTTP method.
What this means is that you might be abiding by the “old way” of writing the API routes.
In Next.js 14, the way API routes are structured has changed, and you need to export named functions for each HTTP method instead of using a default export. You should create route.ts files in the app/api/YOUR-NAME directory and export functions like POST and PUT for handling different HTTP methods.
In the above code, this is what is causing the errors described above: export default async function handler and then the requests are triaged via if statements like this: if (req.method === 'POST') {…}
While this used to work previously, this will not work in the new implementation of the app router for APIs.
✅ The Solution
To fix this, we will need to export functions as HTTP methods like this:
In the above code, notice the functions like this:
For PUT:
export async function PUT {…}For POST:
export async function POST {…}
Also, notice how the outputs resemble a NextResponse like this:
Return statement:
return NextResponse.json({ uploadId: uploadData.UploadId, key: uploadData.Key });
Hopefully, this is helpful for showing you how to upgrade your API routes to the new format with Next.js 14 and above!
Looking for more resources?
Read more related content here:
-
 Automating Code Generation with OpenAI GPT Agents: A Developer's Journey to Efficiency
-
 Thankful for the AWS Community Builders Program & Building + AWS Step Functions 101
-
 AWS: Predicting Stock Prices Using AI & NO CODE!
-
 Want to Learn How to Code? Discover the Top 4 Platforms to Kickstart Your Software Engineer Journey of Coding
-
 Turn Your AI Model into a Real Product (Amazon SageMaker, API Gateway, AWS Lambda, Next.js, Python)
-
 Launch your own LLM (Deploy LLaMA 2 on Amazon SageMaker with Hugging Face Deep Learning Containers)
Snag my 7 Days of Development ebook here:
I'll send you a FREE copy of my 7 Days of Development Ebook to get you started writing Python scripts, Node.js functions, Next.js apps, and building in the cloud!
How to fix the PyVis Knowledge Graph error: AttributeError: 'NoneType' object has no attribute 'render'
If you’re trying to build a knowledge graph, you might be using PyVis, which is a fast way to generate visual network graphs using Python. You can use PyVis in Jupyter Notebooks, locally, or in my case, generate the graphs as HTML files and then visualize those.
❌ The Problem
If you’re trying to run your code, you might run into a number of issues, such as AttributeError: 'NoneType' object has no attribute 'render' like what is shown below:

✅ The Solution
Because this code is being executed within a Jupyter Notebook, there are extra parameters that need to be passed into the Network module from PyVis to execute the data network environment, notably, these two values:
notebook: a boolean value, which given the use of Jupyter Notebook, has been set toTruecdn_resources: a string, which can be “in_line” or “remote”, but must be specified within the Jupyter Notebook environment.
This is the line of code I added to the code block:
nt = Network('500px', '500px', notebook = True, cdn_resources = 'in_line')
Fixing this line will only solve part of the issue, as this will throw another error: localhost refused to connect as shown below:

To fix this, we will need to utilize the display module from IPython.core to visualize this html with the following line of code:
display(HTML('nx.html'))
By importing and leveraging the HTML and display modules from IPython.core, we can then add this extra line to display the knowledge graph with: display(HTML(filename='example.html'))
Check out the code and the output below:

Looking for more resources?
Read more related content here:
-
Automating Code Generation with OpenAI GPT Agents: A Developer's Journey to Efficiency
-
Thankful for the AWS Community Builders Program & Building + AWS Step Functions 101
-
AWS: Predicting Stock Prices Using AI & NO CODE!
-
Want to Learn How to Code? Discover the Top 4 Platforms to Kickstart Your Software Engineer Journey of Coding
-
Turn Your AI Model into a Real Product (Amazon SageMaker, API Gateway, AWS Lambda, Next.js, Python)
-
Launch your own LLM (Deploy LLaMA 2 on Amazon SageMaker with Hugging Face Deep Learning Containers)
Snag my 7 Days of Development ebook here:
I'll send you a FREE copy of my 7 Days of Development Ebook to get you started writing Python scripts, Node.js functions, Next.js apps, and building in the cloud!
How to fix the PyVis Knowledge Graph error: localhost refused to connect
If you’re trying to build a knowledge graph, you might be using PyVis, which is a fast way to generate visual network graphs using Python. You can use PyVis in Jupyter Notebooks, locally, or in my case, generate the graphs as HTML files and then visualize those.
❌ The Problem
If you’re trying to run your code, you might run into a number of issues, such as localhost refused to connect like what is shown below:

✅ The Solution
By importing and leveraging the HTML and display modules from IPython.core, we can then add this extra line to display the knowledge graph with: display(HTML(filename='example.html'))
Check out the code and the output below:

Looking for more resources?
Read more related content here:
-
Automating Code Generation with OpenAI GPT Agents: A Developer's Journey to Efficiency
-
Thankful for the AWS Community Builders Program & Building + AWS Step Functions 101
-
AWS: Predicting Stock Prices Using AI & NO CODE!
-
Want to Learn How to Code? Discover the Top 4 Platforms to Kickstart Your Software Engineer Journey of Coding
-
Turn Your AI Model into a Real Product (Amazon SageMaker, API Gateway, AWS Lambda, Next.js, Python)
-
Launch your own LLM (Deploy LLaMA 2 on Amazon SageMaker with Hugging Face Deep Learning Containers)
Snag my 7 Days of Development ebook here:
I'll send you a FREE copy of my 7 Days of Development Ebook to get you started writing Python scripts, Node.js functions, Next.js apps, and building in the cloud!
How to fix the OpenAI API Key Error: “You exceeded your current quota, please check your plan and billing details” or “insufficient_quota”
Are you getting an error from using your OpenAI API key that says “You exceeded your current quota, please check your plan and billing details. For more information on this error, read the docs”. This blog will help you figure out how to get around this error.
Recently, OpenAI changed their billing structure so that instead of a “surprise bill” at the end of the month where you might not know how much you were going to be charged unless you were constantly checking the OpenAI API usage dashboard, you now need to buy “credits” to use the OpenAI API.
As I always had, I proceeded to use my new OpenAI API key as normal with a python script in a Jupyter Notebook like this:
However, this didn’t work and I got an error saying something about how I exceeded my current quota?
It can be quite alarming seeing something like the below without knowing this information.
The Error:
RateLimitError: Error code: 429 - {'error': {'message': 'You exceeded your current quota, please check your plan and billing details. For more information on this error, read the docs: https://platform.openai.com/docs/guides/error-codes/api-errors.', 'type': 'insufficient_quota', 'param': None, 'code': 'insufficient_quota'}}

How to Fix:
To fix this, we will need to go to Settings > Billing > Pay as you go and then click the button that says “Add to credit balance”
This will allow us to deposit credits into our Credit balance

✨ Ta-da! I can now continue with using my OpenAI API Keys

And we can see that the balance went down from $5.00 to $4.99, meaning the key was used and cost me barely anything at all!

I hope this helps you on your AI journey if you encounter this bug!
Looking for more resources?
Read more related content here:
-
Automating Code Generation with OpenAI GPT Agents: A Developer's Journey to Efficiency
-
Thankful for the AWS Community Builders Program & Building + AWS Step Functions 101
-
AWS: Predicting Stock Prices Using AI & NO CODE!
-
Want to Learn How to Code? Discover the Top 4 Platforms to Kickstart Your Software Engineer Journey of Coding
-
Turn Your AI Model into a Real Product (Amazon SageMaker, API Gateway, AWS Lambda, Next.js, Python)
-
Launch your own LLM (Deploy LLaMA 2 on Amazon SageMaker with Hugging Face Deep Learning Containers)
Snag my 7 Days of Development ebook here:
I'll send you a FREE copy of my 7 Days of Development Ebook to get you started writing Python scripts, Node.js functions, Next.js apps, and building in the cloud!
How to fix: Uncaught TypeError: Cannot read properties of null (reading 'addEventListener')
When encountering the "Uncaught TypeError: Cannot read properties of null (reading 'addEventListener')" in JavaScript, ensure your DOM elements are fully loaded before adding event listeners. Wrap your event listener code within a DOMContentLoaded event callback to prevent such errors, as demonstrated in this blog post.
I was working on the mapping of items that I would use for creating a portfolio for a website and I encountered this TypeError about my addEventListener not working:
The error message "Uncaught TypeError: Cannot read properties of null (reading 'addEventListener')" suggests that when the JavaScript is trying to add an event listener, the element it's trying to attach the event to doesn't exist or hasn't been found in the DOM.
However, in this case, the error message is a bit misleading, because document.addEventListener is a standard method and should not be null. The issue is likely not with document.addEventListener itself, but with the line of code where you are adding an event listener to an element with class .close. If this script is running before the DOM is fully loaded, it won't find the element with class .close, and document.querySelector('.close') will return null.
My original code was this:
Here's a corrected version of your script, which ensures that the event listener for the close button is added after the DOM content has loaded:
🛠️ Key Changes Include:
Refactoring the logic to go like this to render static content first, then scripts with DOM Load updates later for the order of operations to take effect:
Static content first (div’s)
Scripts
Styles
A refactor of the DOMContentLoaded call to this:
Looking for more resources?
Read more related content here:
-
Automating Code Generation with OpenAI GPT Agents: A Developer's Journey to Efficiency
-
Thankful for the AWS Community Builders Program & Building + AWS Step Functions 101
-
AWS: Predicting Stock Prices Using AI & NO CODE!
-
Want to Learn How to Code? Discover the Top 4 Platforms to Kickstart Your Software Engineer Journey of Coding
-
Turn Your AI Model into a Real Product (Amazon SageMaker, API Gateway, AWS Lambda, Next.js, Python)
-
Launch your own LLM (Deploy LLaMA 2 on Amazon SageMaker with Hugging Face Deep Learning Containers)
Snag my 7 Days of Development ebook here:
I'll send you a FREE copy of my 7 Days of Development Ebook to get you started writing Python scripts, Node.js functions, Next.js apps, and building in the cloud!

Google Colab disk space vs Google Drive disk space - What’s the difference?
Discover the key differences between Google Colab and Google Drive disk space in our latest blog post. Learn why Google Colab offers ephemeral storage ideal for machine learning and data analysis, while Google Drive provides substantial long-term storage for your files. Find out how to leverage both platforms for your projects, optimize your disk space, and the benefits of upgrading to Colab Pro. Dive into the world of cloud storage and computational services to enhance your digital workspace today.
I recently upgraded a Google Workspace account to Google Business Plus and with it came 5TB of pooled storage! I was so excited to dive into all of this storage.
*asks self: how many LLMs can I store in Google Drive?*
It turns out… a lot.
I immediately opened my Google CoLab account to see what my account said and I noticed something interesting. This is my Google Colab dashboard, and in the bottom left, I noticed that it still said 51.88 GB available 👀.

Upon further inspection, I noticed that it was saying I already had 26.31 GB of a total of 78.19 GB available. So, I had already been using data?

What is going on here (I thought to myself, confused)…
Then, I opened up Google Drive to find out that I did, in fact, have 5TB available. So what’s going on here?

The Core Difference
The discrepancy between the disk space available in Google Colab and Google Drive stems from their fundamentally different purposes and how they allocate resources for us as the users, or creators, of resources. For example, Google Drive is provisioning object storage space for items like PDF documents, while Google CoLab is providing an environment to operate in with ephemeral, short-term, storage for packages, dataframes, and model checkpoints that will get deleted when the environment is terminated.
Google Drive is a cloud storage service designed to store files, documents, photos, and more - your objects - known as object storage. The 5TB of storage space I now had access to reflects this purpose, providing tons of space for all sorts of files.
Google Colab, on the other hand, is a cloud-based service that focuses on machine learning and data analysis. It allows users to write and execute Python in an online notebook, which is fantastic for anyone looking to dive into data science, machine learning, or AI, without the hassle of setups and installations needed to provision your own server. The storage it offers is more about the ephemeral (temporary) disk space available to run these notebooks, rather than long-term file storage.
Why the Disk Space Difference?
Temporary Nature of Colab Resources: The disk space in Google Colab is temporary and is allocated per session. Each session can last up to 12 hours (for free accounts), after which the resources are recycled, and the disk space is cleared. This is why the available disk space is much less compared to Google Drive.
Purpose-Built for Computing: Google Colab's disk space is meant to handle datasets, temporary files, and the execution of machine learning models during an active session. It's not designed to store files long-term like Google Drive. The allocated disk space serves to ensure that the computations for your projects can run efficiently during your active session.
Shared vs. Dedicated Resources: Google Drive's storage is dedicated to your account, meaning the 5TB of space is yours to fill as you please. Google Colab's resources, however, are shared among users, especially in the free tier. This shared model is why there's a cap on the amount of disk space available in Colab, ensuring fair usage among its many users.
Bridging the Gap
While they serve different purposes, Google Colab and Google Drive are designed to work together seamlessly. You can mount your Google Drive within a Colab notebook to access and save files directly. This integration essentially allows you to use your Drive's storage capacity to store datasets or models you're working with in Colab, circumventing the temporary nature of Colab's disk space.
Increasing Disk Size in Google Colab
For those pushing the boundaries of what's possible within Google Colab and finding themselves in need of more disk space, there are a couple of strategies to consider. Whether you're working with larger datasets, need more space for your machine learning models, or simply require more room for installations and libraries, increasing your disk space can help overcome these limitations.
Upgrade to Colab Pro
One of the most straightforward ways to increase your disk space in Google Colab is by upgrading to Colab Pro or Colab Pro+. Personally, I like getting the minimum number of credits needed to accomplish a goal, so I usually will top up my credits rather than get a subscription on the off chance I’m paying for credits I probably won’t need.
These subscription services offer more resources than the free version, including:
Increased Disk Space: More disk space for your notebooks, allowing for larger datasets and more complex computations.
Longer Runtime: Extended session times before your notebook is disconnected, which is crucial for long-running processes.
Priority Access: Higher priority for accessing Colab's computing resources, meaning less waiting time for resources to become available.
Upgrading can significantly enhance your Colab experience, providing the extra resources needed for more demanding tasks.
Use External Storage Solutions
Another method to effectively increase your disk space is by integrating external storage solutions with your Colab notebooks. Here's how you can use Google Drive for this purpose:
1. Mount Google Drive: By mounting your Google Drive in a Colab notebook, you gain access to its storage directly from your notebook. This can be done with a few lines of code:
This approach allows you to store and access larger datasets or models directly from Google Drive, leveraging its storage capabilities.
2. External Cloud Storage: Besides Google Drive, you can also use other cloud storage services like Amazon S3, Microsoft Azure Storage, or Dropbox by integrating their APIs into your Colab notebook. This method requires more setup but offers flexibility in choosing your preferred storage solution.
Optimize Your Storage Use
While increasing disk size can alleviate many issues, optimizing how you use your available disk space is also crucial. Here are a few tips:
Clean Up Regularly: Periodically remove unnecessary files from your Colab workspace to free up space.
Compress Data: Where possible, compress datasets and files before uploading them to your workspace to save space.
Stream Data: For very large datasets, consider streaming data directly from the source instead of storing it all in your workspace.
Conclusion
Understanding the difference between Google Colab disk space and Google Drive disk space boils down to recognizing their intended uses. Google Drive is your cloud-based hard drive for storing a wide range of files long-term. In contrast, Google Colab offers a powerful, temporary workspace for data science and machine learning projects, with disk space tailored to accommodate the computational demands of these tasks.
By leveraging both platforms in tandem, you can maximize your productivity and efficiently manage your storage needs. Whether storing countless large machine learning models on Google Drive or running complex data analysis in Google Colab, you're well-equipped to tackle any project that comes your way.

How to protect your Cognito User Pools on AWS
Are you wondering about the various security mechanisms you have available to you in the AWS (Amazon Web Services) Management Console for their Amazon Cognito authentication service?
Here’s a quick playbook on the various configurations you can make to keep your apps and users protected:
Web Application Firewalls
Deletion Protection

AWS WAF (Web Application Firewall)
Coming soon
Deletion Protection
As described, this feature allows you to ensure that Infrastructure as Code updates, other users, or certain CloudFormation updates cannot delete a certain Cognito user pool while this setting is active. This is especially valuable for when scaling certain AWS resources or systems to add an extra buffer of protection.
Go to your Cognito User Pool of choice and on the tabs, select User pool properties
Scroll down to the section that says Deletion protection
Click Activate
This will bring up a pop-up that looks like the below - select Activate
To learn more about what this will specifically do, check out the AWS docs here


Once completed, you should see a ✅ Active status, meaning the setting was enabled for your Cognito user pool.
How to fix: You're importing a component that needs useState. It only works in a Client Component but none of its parents are marked with "use client", so they're Server Components by default.
If you’re familiar with Next.js 13 and are migrating or upgrading to use Next.js 14, you might see an error like the following as you construct your components and use React hooks like useState, useEffect, useContext, or useQuery.
The error might look like this:
Error: × You're importing a component that needs useState. It only works in a Client Component but none of its parents are marked with "use client", so they're Server Components by default. │ Learn more: https://nextjs.org/docs/getting-started/react-essentials

This error message is really not very helpful, and leaves a lot to be desired about what the actual solution would be.
So how do we fix this?
Component Architecture
To build our example, let’s say that we have a component.tsx that includes logic for a stepper (i.e. to count), so we will use useState in the component… and we want to use that in our main page.tsx file.
[component.tsx] —> [page.tsx]
The Issue
We should just be able to import the component into our page, but because of Next.js 14’s implementation of server components (by default), every .tsx or .jsx file you write will be a server component, and not a client component.
You might be thinking, well I thought they are just components. There is a difference? 🤔💭
It turns out that there is a difference, and anytime you’ve used a React hook like useEffect, or useState, or useQuery, or useContext, you have been indirectly (or directly) writing client React components. This is because the state and data types that are rendered around these components only exist after the DOM has loaded.
We need to specify the distinction of client-only components.
The Solution
To fix this issue, you will need to add the following line of code to line 1 of your file that has the React component:
"use client";
This will denote to the DOM that this component doesn’t rely on server-side rendering, so render it as a client React component.
Keep reading:
Want more resources?
📚 My Ebooks & Guides 📚
💻 My Code, Courses, and Resources 💻
Amazon ECR Docker Push hangs and ends in error with EOF after saying “Retrying in X seconds”
docker push 3234234234234.dkr.ecr.us-east-1.amazonaws.com/name-of-ecr-repo:latest The push refers to repository [3234234234234.dkr.ecr.us-east-1.amazonaws.com/name-of-ecr-repo]84d49c7b6dcd: Retrying in 1 second d2cd686e0f2b: Retrying in 1 second 11b309a0a714: Retrying in 1 second 84c064edcba0: Retrying in 1 second 085af9a0ade7: Retrying in 1 second 593df8e4bac5: Waiting 12c49c4d67f0: Waiting 5f70bf18a086: Waiting cd0b79f24bf2: Waiting bab0e23e8c77: Waiting 7393ae547845: Waiting 8a907b4bbcbf: Waiting c8ae34277e89: Waiting a353f0ecb543: Waiting EOFWhat can happen if you have multiple users, especially if you have IAM Identity Center with multiple accounts that can assume many different roles, it might get confused about the authenticated user you want to assume.
What we can do if we have IAM Identity Center set up is go right to the programmatic access section and use that key and secret key in coordination with the AWS CLI to configure an IAM role that we can assume to update ECR.
Read the docs here: https://docs.aws.amazon.com/cli/latest/userguide/cli-configure-files.html

Configure AWS profile (the easy way)
aws configure --profile AccountID_IICPermissionSet
[Company_AccountID_PermissionSet]
aws_access_key_id=XXXXXXXX
aws_secret_access_key=XXXXXXXXXX
aws ecr get-login-password --profile AC_585477435234_PowerUserAccess --region us-east-1 | docker login --username AWS --password-stdin 585477435234.dkr.ecr.us-east-1.amazonaws.com
IAM Identity Center user credentials won’t work:

It needs to be an Access Key created under an IAM user

Needs to be a unique user key associated with a user and not with short-term credentials that expire quickly and regularly like those made by IAM Identity Center.
How to Prevent Caching on Fetch Requests to An API (Squarespace + Vanilla JS)
Something strange that I noticed when I was trying to implement pagination for my Squarespace blog was this weird, what I thought was, a legacy caching behavior from my old code.
Upon further inspection, I learned that I was able to query a blog with this construction:
curl -s 'https://name-here.squarespace.com/blog-name-here/?format=json-pretty' | jq '.collection.categories'
This will pass back an array of categories related to your blog.
❌ Regular browser session not working
That being said, I was using this construction in my api request, and I kept getting this response - the categories of my old data:

✅ Incognito browser working 🧐
There are supposed to be many more pages here… and when I went to an incognito browser window, I saw all of the categories for my blog:
Testing Cache-Busting in the terminal
In case the browser is caching an older version of the json-pretty output, I implemented a cache-busting technique of appending _= with the current timestamp to avoid cached data and fetch unique data every time.
To test this, I ran the following code in my terminal:
curl -s "https://name-here.squarespace.com/blog-name-here/?format=json-pretty&_=$(date +%s%3N)" | jq '.collection.categories'
Method #1: To implement this with Vanilla JS, I wrote this to fetch the data without caching:
fetch('/name-here.squarespace.com/blog-name-here/?format=json-pretty&_=' + new Date().getTime())
.then(response => response.json())
.then(data => {
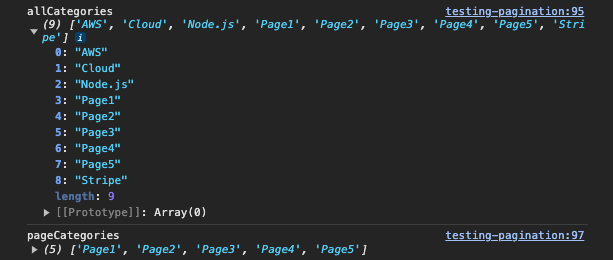
const allCategories = data.collection.categories;
console.log('allCategories', allCategories)
const pageCategories = allCategories.filter(category => category.includes('Page'));
console.log('pageCategories', pageCategories)
const totalPages = pageCategories.length;
console.log('totalPages', totalPages)
})
.catch(error => console.error('Error fetching categories:', error));
}
In this code, I am appending the Date().getTime() to generate unique fetches for the blog JSON data and then this enforces a non-caching policy.
Method #2: To implement this with Vanilla JS, I wrote this to fetch the data without caching:
fetch('/name-here.squarespace.com/blog-name-here/?format=json-pretty', { cache: 'no-cache' })
    .then(response => response.json())
    .then(data => {
      const allCategories = data.collection.categories;
      console.log('allCategories', allCategories)
      const pageCategories = allCategories.filter(category => category.includes('Page'));
      console.log('pageCategories', pageCategories)
      const totalPages = pageCategories.length;
       console.log('totalPages', totalPages)
    })
    .catch(error => console.error('Error fetching categories:', error));
}
In this code, I am appending the { cache: 'no-cache' } no-cache directive to the fetch function in order to inform the fetch function that the data fetched should be unique and impartial to fetching. This method is my personal favorite and I find easier to conceptually implement than time stamps, but in case this method does not work, the Method #1 is an option as well.
🥳 The finished solution
At long last, we finally have a way to fetch unique items without worrying about data that may or may not be cached, and it is very fast. If all goes well, you will see your un-cached, complete, data here:

How to Use Google Fonts with a Content-Security-Policy
A Content Security Policy is an important mechanism for protecting your technology, software, and apps when they are deployed to the World Wide Web. However, if you want to provision a Content-Security-Policy when using Google Fonts, it can be quite tricky.
If you do not provision the Content-Security-Policy in the right way, your Google fonts will throw tons of errors in the Chrome Browser DevTools Network tab like this:

In the Chrome Browser Console tab, you might also see something like this if the Content Security Policy isn’t provisioned just right:

Yikes!
So how do we solve for this?
Directive #1: font-src
This determines what font scripts can load on the domain.
Google Fonts get loaded from this domain: fonts.gstatic.com — so we need to allowlist this domain in our font-src
```
font-src 'self'
          data:
          https://fonts.gstatic.com
          ;
```
Directive #2: style-src
This determines what stylesheet scripts can load on the page. Google Fonts get loaded from this domain: fonts.gstatic.com — so we need to allowlist this domain in our style-src
```
style-src 'self'
          https://fonts.googleapis.com
          ;
```
🥁 Drum roll…
Our Content-Security-Policy will look something like this:
```
<meta http-equiv="Content-Security-Policy" content="
        default-src 'self';
        font-src 'self'
                data:
                https://fonts.gstatic.com
                ;
       style-src 'self'
                https://fonts.googleapis.com
                ;
">
```How to connect Amazon Cognito to a Content-Security-Policy
awefawef
Refused to connect to 'https://cognito-identity.us-east-1.amazonaws.com/' because it violates the following Content Security Policy directive: "connect-src 'self'
You might seen an error like this:

Connect-src needs to have https://cognito-identity.us-east-1.amazonaws.com/ in this directive to authenticate access to the Amazon Cognito Service.

How to fix AWS Amplify error: 🛑 Codegen job status is failed No UI components to generate
If you are using amplify push or amplify pull and use the AWS AppSync for your managed GraphQL API, you might experience an issue where as AppSync tries to manually import the API schema from the schema.graphql file, it then will error and say something like the following: ⠸ Generating UI components...🛑 Codegen job status is failed No UI components to generate What is happening here is that locally, it has pulled the API, but it is not able to compile the queries, mutations, and subscriptions via AWS AppSync…
If you are using amplify push or amplify pull and use the AWS AppSync for your managed GraphQL API, you might experience an issue where as AppSync tries to manually import the API schema from the schema.graphql file, it then will error and say something like the following:
⠸ Generating UI components...🛑 Codegen job status is failed No UI components to generate
What is happening here is that locally, it has pulled the API, but it is not able to compile the queries, mutations, and subscriptions via AWS AppSync.
It might look something like this:

Let’s discuss how to solve this issue…
Solution #1
If the statements have never been generated before, run:
amplify add codegen
This will configure the AppSync GraphQL API queries, mutations, and subscriptions in your designated folder of choice.
In case you need the AppSync API, you can retrieve that in the AppSync dashboard of the AWS Management Console > AppSync > API (yours) - and then look for the AppSync API ID in the configuration settings.
Solution #2
If the statements have been generated before, run:
amplify codegen statements
If you require typescript, also run:
amplify codegen types
This will configure the AppSync GraphQL API queries, mutations, and subscriptions in your designated folder of choice.
🥁 The result…
Here, the GraphQL statements were generated:

Keep reading:
Get additional resources:
💻 My Code, Courses, and Resources 💻
📚 My Ebooks & Guides 📚

How to fix the AWS Lambda error: AWS Lambda AccessDeniedException not authorized to perform: cognito-idp:AdminUpdateUserAttributes
How to fix the AWS Lambda error: AWS Lambda AccessDeniedException not authorized to perform: ssm:GetParameters on resource because no identity-based policy allows the ssm:GetParameters action
So you are using AWS Parameter Store and then try to run your AWS Lambda function, only to be met with this odd error claiming: AccessDeniedException not authorized to perform: cognito-idp:AdminUpdateUserAttributes on resource because no identity-based policy allows the cognito-idp:AdminUpdateUserAttributes action
This might look like the following below:
error updating Cognito user:  AccessDeniedException: User: arn:aws:sts::476226016957:assumed-role/thecapv2react1f3e7babPostAuthentication-dev/thecapv2react1f3e7babPostAuthentication-dev is not authorized to perform: cognito-idp:AdminUpdateUserAttributes on resource: arn:aws:cognito-idp:us-east-1:476226016957:userpool/us-east-1_2XTSL3Jom because no identity-based policy allows the cognito-idp:AdminUpdateUserAttributes action
    at Request.extractError (/var/runtime/node_modules/aws-sdk/lib/protocol/json.js:52:27)
    at Request.callListeners (/var/runtime/node_modules/aws-sdk/lib/sequential_executor.js:106:20)
    at Request.emit (/var/runtime/node_modules/aws-sdk/lib/sequential_executor.js:78:10)
    at Request.emit (/var/runtime/node_modules/aws-sdk/lib/request.js:686:14)
    at Request.transition (/var/runtime/node_modules/aws-sdk/lib/request.js:22:10)
    at AcceptorStateMachine.runTo (/var/runtime/node_modules/aws-sdk/lib/state_machine.js:14:12)
    at /var/runtime/node_modules/aws-sdk/lib/state_machine.js:26:10
    at Request.<anonymous> (/var/runtime/node_modules/aws-sdk/lib/request.js:38:9)
    at Request.<anonymous> (/var/runtime/node_modules/aws-sdk/lib/request.js:688:12)
    at Request.callListeners (/var/runtime/node_modules/aws-sdk/lib/sequential_executor.js:116:18) {
  code: 'AccessDeniedException',
  time: 2022-11-17T20:11:47.074Z,
  requestId: '2b83bdf5-ae2c-4fab-af9a-a5ec8b068602',
  statusCode: 400,
  retryable: false,
  retryDelay: 56.66083548666978
}
So this means we haven’t set up identity access for this function to run the service. We will do the following:
amplify update function
Select the function we want to edit
? Which setting do you want to update? (Use arrow keys)
❯ Resource access permissions
? Select the categories you want this function to have access to.
 ◯ api
❯◉ auth
 ◯ storage
 ◯ function

? Select the operations you want to permit on thecapv2react1f3e7bab
 ◯ create
❯◉ read
 ◉ update
 ◯ delete
So what does this mean?
What’s happening here is that you aren’t stringifying your API Key and as a result, it is coming up as undefined.
The key-value pair of your environment variable might be valid (i.e. REACT_APP_PUBLISHABLE_KEY=pk_live_43435345awf34t) but you will want to stringify it.
The issue:
Notice how the process.env.ELEMENT is inserted into the input of the loadStripe method of the @stripe/stripe-js SDK? This will lead to an error because the value is undefined at start.
The solution:
We’ll turn the environment variable into a template literal with
${ENV}to effectively stringify this value, ensure that it can’t NOT be undefined, as we load it into theloadStripemethod.Here, we will see that this will allow us to call the stripe API using our Stripe Publishable Key and create a session for the checkout.
Further Debugging:
✨ If you are getting further issues, double-check that your .env file has the environment variable written correctly, like this:
REACT_PUBLIC_STRIPE_TEST_PUBLISHABLEKEY=pk_live_1234567890abcdefghijklmnop
^ Notice that there are no spaces between the key (first-part) and the value (second-part) of this value.
✨ Also, if you have just created the environment variable, make sure to re-start your server. ENV’s are available at build time, but not upon re-renders. Make sure to give your server or application a good ‘ole stop and start to make sure that the environment variables can be reloaded into your build and then proceed as expected.
Let me know if you found this post helpful! And if you haven't yet, make sure to check out these free resources below:
Subscribe to the Tech Stack Playbook™️ for more content:
Listen on Spotify:
Links
Let’s Connect Online:
☕️ By me a coffee to support my channel: https://buymeacoffee.com/brianhhough
📲 Let's connect on Instagram: https://instagram.com/brianhhough
🤝 Let's connect on LinkedIn: https://linkedin.com/in/brianhhough
🌟 Check out my other episodes: https://www.brianhhough.com/techstackplaybook
📚 Take my FREE 3-Hour Solidity & Web3 Course: https://youtu.be/il9s98lPGqY
Get Some Cool Stuff:
*These affiliate links are commission-based
👨💻 Codecademy — get a FREE MONTH of a Pro membership: http://ssqt.co/mQgVi7z
✨ Upgrade your workspace — check out my workspace essentials on Kit.co: https://kit.co/BrianHHough/workspace-essentials
💰 Coinbase — get $10 FREE of Bitcoin: https://coinbase.com/join/hough_7?src=ios-link
💸 Robinhood — get a FREE stock: https://join.robinhood.com/brianh4666
📇 Unstoppable Domains — get a FREE blockchain domain name: https://unstoppabledomains.com/?ref=5ef8
📈 Kajabi — get a $150 credit (free month) to launch your online digital business: https://app.kajabi.com/r/dAczTf9d
🧱 Alchemy.io — get 85M free web3 compute units: https://alchemy.com/?s=TMwNjM1MTI0MDQ1O
🖥 Autonomous.ai — build a smart workspace with a FREE $25: https://bit.ly/38REicE (or use code R-bhh210)
How to fix the AWS Lambda error: AWS Lambda AccessDeniedException not authorized to perform: ssm:GetParameters on resource because no identity-based policy allows the ssm:GetParameters action
So you are using AWS Parameter Store and then try to run your AWS Lambda function, only to be met with this odd error claiming: AccessDeniedException not authorized to perform: ssm:GetParameters on resource because no identity-based policy allows the ssm:GetParameters action…
So you are using AWS Parameter Store and then try to run your AWS Lambda function, only to be met with this odd error claiming: AccessDeniedException not authorized to perform: ssm:GetParameters on resource because no identity-based policy allows the ssm:GetParameters action
This might look like the following below:
So what does this mean?
What’s happening here is that you aren’t stringifying your API Key and as a result, it is coming up as undefined.
The key-value pair of your environment variable might be valid (i.e. REACT_APP_PUBLISHABLE_KEY=pk_live_43435345awf34t) but you will want to stringify it.
The issue:
Notice how the process.env.ELEMENT is inserted into the input of the loadStripe method of the @stripe/stripe-js SDK? This will lead to an error because the value is undefined at start.
The solution:
We’ll turn the environment variable into a template literal with
${ENV}to effectively stringify this value, ensure that it can’t NOT be undefined, as we load it into theloadStripemethod.Here, we will see that this will allow us to call the stripe API using our Stripe Publishable Key and create a session for the checkout.
Further Debugging:
✨ If you are getting further issues, double-check that your .env file has the environment variable written correctly, like this:
REACT_PUBLIC_STRIPE_TEST_PUBLISHABLEKEY=pk_live_1234567890abcdefghijklmnop
^ Notice that there are no spaces between the key (first-part) and the value (second-part) of this value.
✨ Also, if you have just created the environment variable, make sure to re-start your server. ENV’s are available at build time, but not upon re-renders. Make sure to give your server or application a good ‘ole stop and start to make sure that the environment variables can be reloaded into your build and then proceed as expected.
Let me know if you found this post helpful! And if you haven't yet, make sure to check out these free resources below:
Subscribe to the Tech Stack Playbook™️ for more content:
Listen on Spotify:
Links
Let’s Connect Online:
☕️ By me a coffee to support my channel: https://buymeacoffee.com/brianhhough
📲 Let's connect on Instagram: https://instagram.com/brianhhough
🤝 Let's connect on LinkedIn: https://linkedin.com/in/brianhhough
🌟 Check out my other episodes: https://www.brianhhough.com/techstackplaybook
📚 Take my FREE 3-Hour Solidity & Web3 Course: https://youtu.be/il9s98lPGqY
Get Some Cool Stuff:
*These affiliate links are commission-based
👨💻 Codecademy — get a FREE MONTH of a Pro membership: http://ssqt.co/mQgVi7z
✨ Upgrade your workspace — check out my workspace essentials on Kit.co: https://kit.co/BrianHHough/workspace-essentials
💰 Coinbase — get $10 FREE of Bitcoin: https://coinbase.com/join/hough_7?src=ios-link
💸 Robinhood — get a FREE stock: https://join.robinhood.com/brianh4666
📇 Unstoppable Domains — get a FREE blockchain domain name: https://unstoppabledomains.com/?ref=5ef8
📈 Kajabi — get a $150 credit (free month) to launch your online digital business: https://app.kajabi.com/r/dAczTf9d
🧱 Alchemy.io — get 85M free web3 compute units: https://alchemy.com/?s=TMwNjM1MTI0MDQ1O
🖥 Autonomous.ai — build a smart workspace with a FREE $25: https://bit.ly/38REicE (or use code R-bhh210)